Followers

Showing posts with label Easel Card. Show all posts

Monday, March 05, 2012

FF Challange: Add a Charm

Hi peeps and Forever Friends Challengers

Here's the latest fortnightly challenge card, which this time is... 'Add a Charm'. 

Remember, you don't have to use a Forever Friends image on your card.  You can either use one of those gorgeous, huggable bears or, you can use any other image of your choice, as long as it is an animal. Now, you're not telling me that you don't possess an animal stamp, digi, decoupage sheet or just an old birthday card that you can recycle and add a charm too... are you??? Thought not!

Now go create a card and take part in this fortnight's challenge. It's a great way to get inspiration, but it's also a great way to showcase YOUR work.

We'd love to see what you create and who knows, maybe you'll even get to win a prize??? Good luck.

Here's my card for the challenge.

I decided to make an easel card (mainly because I haven't made one for a while and also because I like the way charms hang on easels) to which I added the digi image.  I also added a sentiment (freebie) from Create with TLC. I also added a Birthday sentiment from Craftwork Cards to which I adhered my Charm, with a little wire, to the card and then added some colour co-ordinated ribbon as well.

I cut out some letters and spelt 'SISTER', on plain white card and added them along the bottom of the easel 'stopper'. I then traced around the outline of the letters with a gellyroll glitter pen and then added some gemstones to finish it off.

Thanks for taking the time to visit my blog today and good luck!

Hugs,

Thursday, December 29, 2011

Winter Fairy Talva

Hello fellow crafters and creative geniuses...

Well, hopefully as you can see, Santa bought my creative mojo back and I have made not one, or two... but THREE cards this morning, which I am really pleased with as they all turned out exactly as I pictured them in my head.

The first is using a new digi stamp from the ever talented Mo Manning over at Digital Pencil Too. Those of you who know me, know that apart from Vampires and all things super natural / paranormal, I absolutely love Fairies, hence my name. So here is a card I have made using one of Mo's winter fairies.

I decided to make the card an easel card and used my scalloped edged card bases from Craftwork Cards to produce it.  I used my large die cuts to create the topper cardstock and then cut out the image using one of the smaller ones. After cutting the image I kept it in the frame and then inked the edges using a make up sponge and some ink from one of my pads (Strawberry Fool from www.elzybells.co.uk)

I coloured the image using my promarker pens and added a little glitter to her wings.

I then added some gems to stand the easel up and a greeting and some ribbon. I  decided to make the greeting the same colour as her wings as I think there might have been a little too much red on it otherwise and I think the blue breaks it up just right.

I think I might get quite a bit of use out of this stamp as not only is it good for Christmas but I can also get away with using it for winter birthdays etc.

Anyway, I hope you like it and to finish the whole thing off, I have added a photograph of the whole card closed, so that you can see more detail rather than just the open card. If you click on the image it should bring it up even larger for you so that you can see how I have created the folds and pleats in her skirt, using not only my promarkers but also by using my Derwent pencils to create shadow and light. Hopefully I did it correctly, I found this brilliant tutorial on You Tube. If I can find it again, I will post it here so that you can see what I followed. Although I know most of you out there are already very capable of producing brilliant cards, some might find the video useful.

Hope you like it and thanks for stopping by today.

Hugs and kisses.

Monday, August 08, 2011

Devoted & Dashing Dad


Hi girls (and guys)

This fortnights challenge on the Forever Friends challenge blog is to create a ROUND CARD. Remember, you don't have to use a Forever Friends image if you don't have one as long as you use an animal.


This fortnight's challenge is sponsored by Di's Digi Downloads and she very kindly gave the DT some images to use on our creations.  As you can see, my card is not exactly a round one but the front of the easel is. I had originally made the easel round as well but I wasn't happy with the finished result. So I remade it with a square base and a round easel and I think it worked out well.

I used a selection of different papers, merged the digi image with a sentiment from Create with TLC and coloured the image in with my promarker pens. I added a round birthday sentiment from Craftword Cards and job done.

Not entirely happy with the finished result, I reprinted the image again and coloured it the same way as the original and decoupaged the bear only to the front.


Here's a slightly smaller image so that you can see the decoupaged area.

I hope that you will decide to join in the fun this time and good luck.  I hope you like my card that I created for the Design Team.

Thanks for stopping by, hugs xxx

Monday, June 27, 2011

A Splash of Lime!

Hi girls (and guys)
Hope you have not been too worn out by the 'heat wave' we have had today.

Just wanted to share a little card I have been making this evening for the new Baby Cremins. Hayden Thomas, who was born on 23rd June 2011.

I thought I would enter this card into the following challenges:
All Sorts - Lemon and Lime
Cute Card Thursday - Sketch #170
Mo's Digital Pencil Challenge - Fancy Folds

As you can see, the card mainly consists of lemon and lime colours and I have used the sketch as requested by Cute Card Thursday and the image is one of Mo's, using an easel 'fancy' fold.

Hope you like the card.

Hugs xxx

Monday, April 11, 2011

Let's Celebrate

Hello again,

Here's the second card I have made today, using another of my Fizzy Moon stamps. This time, I made an easel card.  I wasn't sure about the large circles on this card at first but I think it has now grown on me.

You can't really see it in the picture, but the image has been decoupaged and I have used clear glaze on the bottle and the bears nose. I used some more DP from the Sweet Owl collection and added some ribbon down one side.

I added quite a few pearls to the pink mirri card circle on the bottom right and added a sentiment.

On the base of the card I added some more DP which was mounted with foam pads and used some more ribbon and added a printed birthday greeting.

Hope you like the card?

Hugs xxx

Saturday, April 09, 2011

Ela's First Birthday

Hello fellow crafters and friends

Just thought I would take some time on this gloriously sunny day to upload a few of the cards I have made in the past week or so.

This first one is for Ela Mai's FIRST Birthday and was created using an image from Mo Manning at Digital Pencil Too.

I made an easel card base and then decorated the top. I printed off the image and added the words, then cut a circle around it using my circle cutter. I then cut a slightly larger circle out of diamond mirri card. After I coloured the image using my promarkers, I added some DP to the base card, some flowers and some pearls. I then mounted it the 'circles' to the base of the easel with foam pads.

Thanks for stopping by, hugs xxx

Friday, March 11, 2011

Peaches and Cream

S'mee again. Here's my final card for today (so far). This card is also made using Coco with Heart by Digi Stamp Boutique (OMG I just love these bears).  I coloured him in exactly the same Copic colours as my previous card. As you can probably tell, I really liked the way I coloured the image on the card I made for Emma's 21st, that I decided to copy it and make another one for this easel card.

I made the easel base and covered the front part and the bottom of the easel base in DP from Craftwork Cards.

The base part I edged with a Martha Stewart border punch and added three large, pink gems.

To the front of the easel card I added some pink and cream ribbon to and used my circle cutter to cut the image out. I then made a slightly larger circle out of holographic mirri card and DSST'd them together and mounted the whole thing to the front of the card using foam pads to give it some dimension.  I then coloured a white greeting (also from Craftwork Cards) in the same Copic colour as Coco's heart and added some flowers using my glue gun.

Hope you like it.
Thanks for stopping by, hugs

Wednesday, February 09, 2011

Red and Black Valentine

Hi girls (and fellow crafters)

So, Elaine at work, really liked my Pink and Black Valentine card that I made for my hubby Steve for Valentine's Day, so she asked me if I would make a similar one for her hubby Steve, also for Valentine's Day. So here is my card (for her), only this one is red and black (with a hint of white). Hope she likes it?

I used exactly the same spec as before only this time I used Coco with Heart from the Digi Stamp Boutique. She really liked these bears so I decided to use this image instead of a Penny Black one. I used promarkers: Umber, Cocoa, Cinnamon, Cardinal Red and Ruby.

I am entering this card into this week's Passion for Promarkers challenge 'Let there be love'. Hopefully they will like it? As their DT always offer us such fabulous inspiration. Pop on over and enter the challenge for yourself. It's great fun.

Hope you all like the card.
Thanks for stopping by.

Hugs, Fae xxx

Friday, January 28, 2011

Pink and Black Valentine

Hi Girls (and fellow crafters)

Just a little something I thought I would share with you that I put together for St Valentine. I decided to make a card for the Penny Black challenge 'January Sales'.

I bought the Spellbinders Nestabilities (Beaded Circles) and the Martha Stewart heart punch in Watford Market, from my friend Sue, and also the new Card Candy by Craftwork Cards (so glad that Sue has started selling these there too...yipppeeeee!). The Penny Black stamp 'Aren't you lovely?' I have had for a while but haven't used for a long time. Oh, and the ribbon was bought in the January Sales at Hobbycraft too. The lovely cherub charm, was a prezzie from Mum, who got them in Tesco.

So, I stamped the image onto plain white card and then cut it out with the largest of the Beaded Circles Nesties. I then coloured him in with my ProMarkers: Blossom, Rose Pink, Black, Ice Grey 3, Cool Grey 3 and Cool Grey 5. I then got a red coloured pencil and shaded certain parts of the hearts on the bow tie. I then put the three colours Card Candy around the scalloped edges of the die cut image.

Next, I cut a strip of Pink Petticoat white and pink polka dot paper and used my MS heart border punch to cut the top and the bottom of the strip. I did the same with the black mirri card, making sure that the mirri card was slightly thicker than the pink so that both strips of hearts would be seen. Once that was mounted I attached my long piece of 'kisses' ribbon which I wound around the card twice and tied in a knot, once I had attached the silver cherub. I then mounted the die cut image to the whole thing to another piece of the white and pink polka dot paper and mounted that again onto a piece of card.

I then made the easel base. I mounted some more white and pink paper onto some black mirri card and left a thin border around the edge. I then cut a thin strip of black mirri card and border punched it as before. I printed out my 'sentiment of the month' 'If I tell you I love you... can I keep you forever?' from Create with TLC and mounted that with foam pads. Finally, I cut out a white heart by hand and ran that through my Big Shot using the Dots Cuttlebug embossing folder and stuck it to the top right hand corner of the sentiment. Et voila! Job done!

I am really pleased with how this card came out and hope you will like it too.
Thanks for stopping by

Hugs, Fae xxx

Saturday, May 15, 2010

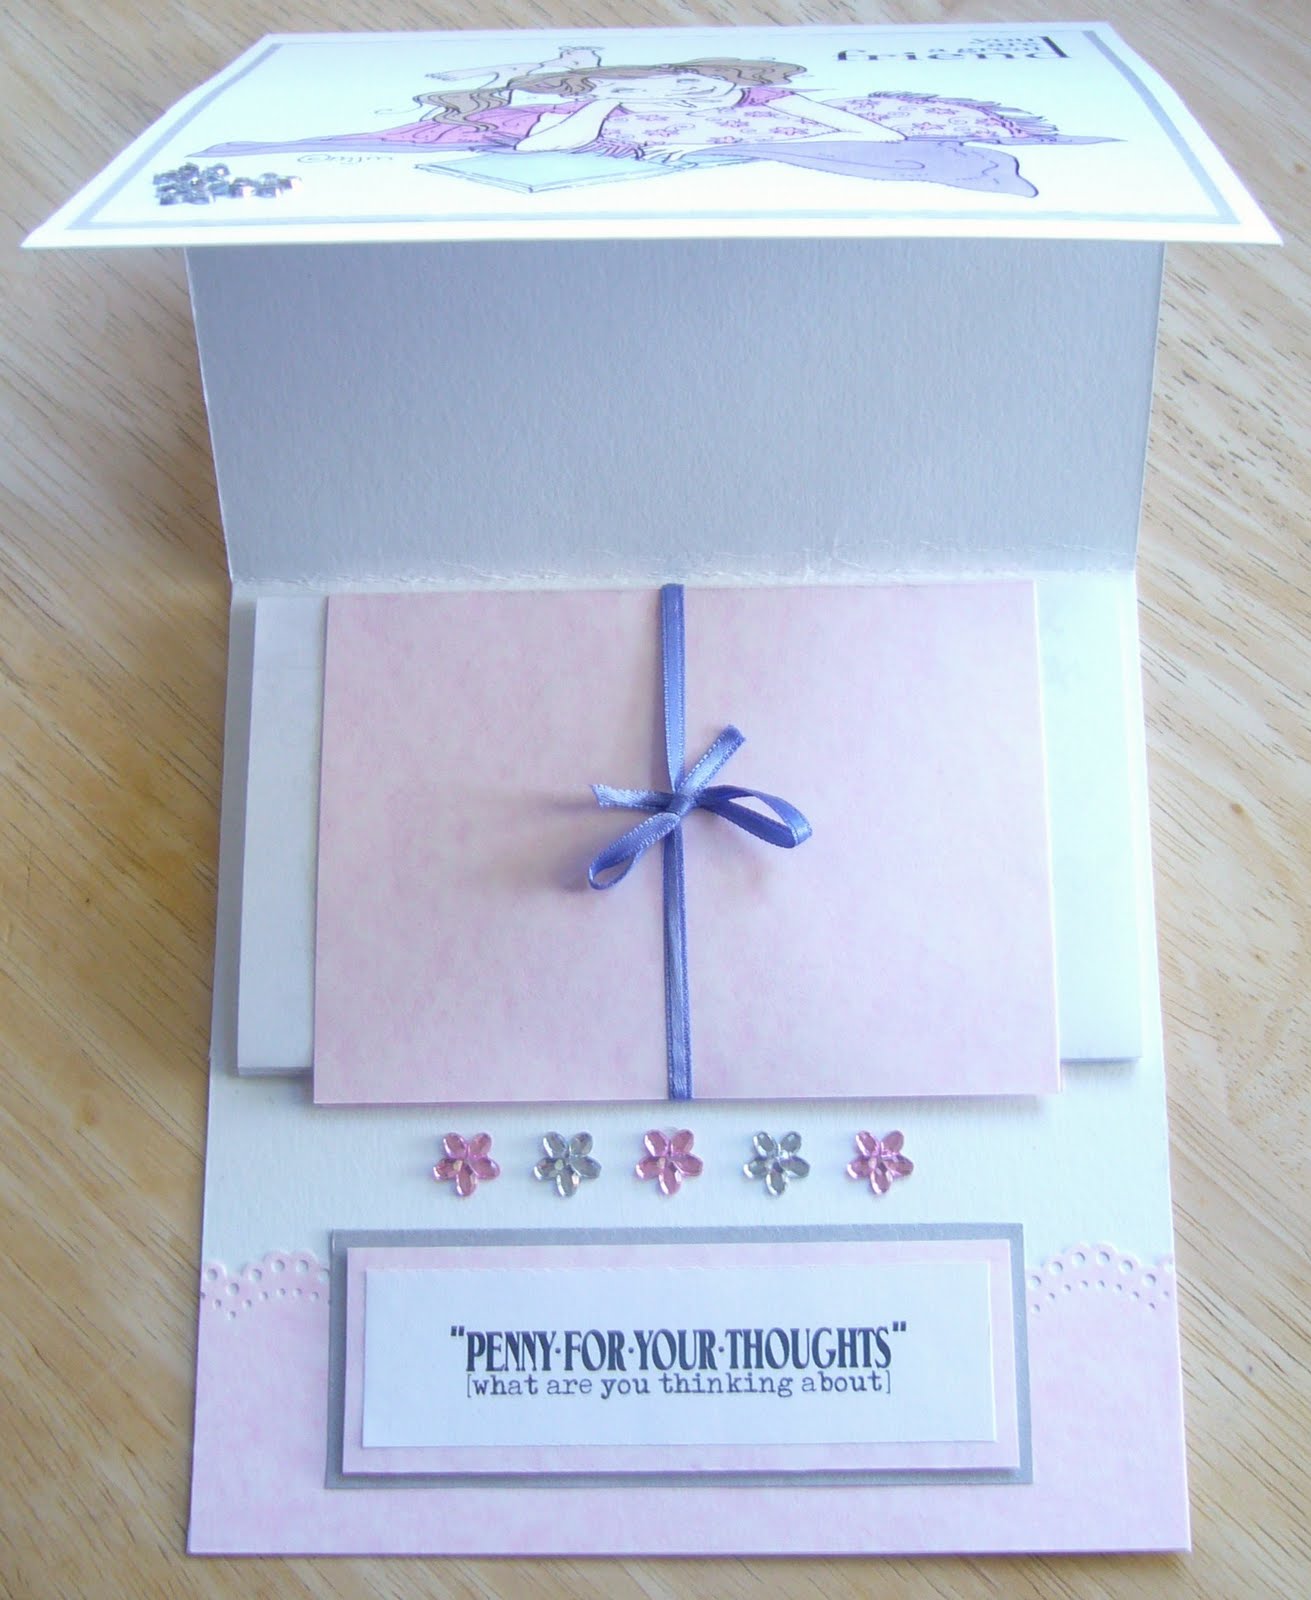
Penny for Your Thoughts

I made this card for my friend Sarn to show her that I was missing her and looking forward to seeing her at Alexandra Palace this September if she has the means to travel down here. I wrote a really long letter to tell her what was on my mind and then made the easel card to house the letter.

The image on the front of the card is a freebie from the wonderful Mo Manning at Mo's Digital Pencil.  I just love her images and the freebie ones that she gives out to her loyal customers every now and again are well worth getting your hands on as they are equally as adorable as the ones you can purchase through her web site.

Anyway, after I created the outside with my mo' image and the various cardstocks used, I then visited TLC and picked up this lovely sentiment (which was also a freebie) that was perfect for the image and then added that to the bottom of the inside of the card.  I then added the adhesive gem flowers and then proceeded to make a sort of envelope for my letter which I then also added to the inside of the card (as you can see in the picture). I then decorated the envelope with my Stampendous swirly butterfly stamp and popped it in the post.

I have entered the card into the Dare U to Digi Stamp Challenge, 'Anything Goes'

Thanks for stopping by.
Fae xxx

Saturday, May 08, 2010

Communion Cards 1...2...3

I was asked to make three Communion cards this week for a colleague at work, for her Niece, as she had looked in the High Street and couldn't find anything 'special'.  I looked online and couldn't find any inspiration there either, and although I have only ever made two Communion cards EVER before, this is what I came up with...

This was the first of three cards, and it was quite a challenge.  Because they are for the same girl, I had to make three really different cards. The image was from the internet, which I mounted onto black mirri card and added some black and white polka dot ribbon.  I then added some white adhesive pearls.  I printed the image off twice and decoupaged the head and shoulders of Jesus and part of his cape, I think you can just about see this in the picture.
I then set about making the second of the three and again, needed some inspiration.

All I was told was that the girl in question DIDN'T LIKE PINK! So this card was made using a rose red and cream background.

I mounted the background paper onto cream cardstock and then added the image, which again came from the Internet and then I added the ribbon and the pearls as before.  I also added a pearl flower to the bottom left corner as an added finishing touch.  The wording was added after it had been mounted onto gold mirri cardstock.

The third and final card was especially hard to make as I didn't think I could possibly top the first two - I really, really liked them both and was really pleased with how they turned out.  Not wishing to blow my own trumpet or anything, but I really felt that these two cards were up in the top ten of all my handmade cards. I was that pleased!

So, onto the third card and this was cream and gold. I had a lot of gold mirri card left over and so decided to keep it simple but pretty.  This card was made with a simple verse and a lot of pearls.  A lot of pearls!

First of all, I ran some cream card through my big shot with a Cuttlebug embossing folder and then I mounted it onto gold cardstock with a very thin border.  I then did the same with the verse.  I added some gold ribbon and some pearls and then the card was done.

I made all three cards Easel cards and decorated the insides to match the outsides.  Jane was over the moon with all three and I hope that Jessica, the little girl celebrating her communion will be just as thrilled with them.  One is for Jane to send, the Cousin card is from Jane's children and the Grand-daughter card is from Jane's mother, who also liked the cards.  A job well done and as I said before, I am really pleased with how they came out, but please, don't ask me for any more Communion cards just yet, I'm all religioned out!!! Below are a few more images for you to see of the cards in black and white and at different angles, but I still don't think that the photographs are doing the cards much justice.


Thanks for stopping by, Fae xxx

Saturday, March 13, 2010

Lilac Blossom

This is another easel card that I made for my friend, Wendy, to give to her mum on mother's day. She likes simple and elegant cards and she loved these flowers. I stamped the flowers with lilac and then sprinkled with glitter. The background paper I have had for a while and therefore don't remember who made it.

A simple lilac ribbon and some words to finish. I then cut a border from the same background paper for the inside bottom of the easel and then punched it with my doily punch by Martha Stewart. Wendy liked it and I hope her mum will too. Happy Mother's Day for tomorrow to all mum's old and young - have a great day! You deserve it.

Sunday, March 07, 2010

Lilac Blooms

This is a different easel card that I made last night also, for my mother-in-law. Her colours as you can probably tell are lilac and purple.

I was a little nervous colouring this card as it was the FIRST TIME EVER USING SANSODOR with blending stumps! I think I did pretty good for my first attempt though and I was really pleased with the finished result. I am sure that Gwen will love it as Steve was really pleased with it too.

The image is from Lili of the Valley which I stamped onto plain white card. I then added a strip of white card behind the image which I stamped using a rather lovely butterfly stamp that my mate Sarn gave me a while ago, I think it's Stampendous, but she would know for sure??? I'm not very good at remember names am I? The 'sending sunshine' sentiment is Hero Arts and so is the little dragonfly next to it, which I stamped three times and then added the little dashes with a black pen freehand. I added the ribbon and the flowers and then put all the layering together. Looks pretty good I think and, as I said before, I was really pleased with how the Sansodor looked when I had finished colouring the image with my coloured pencils.

Other Views:


Spring is in the Air

This is the card I made last night for the Saturday Sketch Challenge and the Penny Black Saturday Challenge. The Penny Black challenge involved making an Easel Card (my favourite, so no hardship there) and the Sketch Saturday Challenge involved using the sketch (layout) which I have copied to the latter.

I decided that my theme would be Mother's day as I still had yet to get around to making mum's card, and her favourite colours are spring colours, yellow, cream and lime tones of green.

I stamped the image onto plain white card which I then ran through my BigShot with my circle nestabilities. I then coloured it and restamped it onto another sheet of plain white thin card. Where the flowers overlap the circle die, I then cut out the individual flowers and mounted them with foam pads.

I then made my base card for the easel and added the green cardstock at the bottom, which I used my faithful Martha Stewart punch to edge and then proceeded to use different coloured card to make up the sketch design. I then simply added the Penny Black image so that I could add the card to their Challenge for this week too. Mum loves my Penny Black stamps so I knew she would love the image on this particular card and the colour scheme really works well with the colours on the image too. Hope the challenge blogs like my design this week.

Fingers crossed x


Saturday, March 06, 2010

For Sharon's Mum

I made this card for my friend Sharon, her mum is celebrating her birthday on Tuesday next week and she wanted a card that showed how her mum's dog always pulled her when she walked it, obviously it had to be funny. I got the idea from a free clip art image and then just added details like her mum's coat, the dog itself, who is sandy coloured and slightly curly (not to mention slightly nuts) and then I added the easel base card (yes, another easel card...sorry but I love them so much) and then added the border, edged with Martha Stewart's Doily Punch and added some ribbon and the flowers with gemstones. The MUM was handdrawn and cut out by hand and then foam mounted just above the border. Hope she likes it.

Camper Love

I made this card for my friend, Claire, who is celebrating her wedding anniver- sary today. She has just started making cards with her daughter but wasn't having a luck of luck with inspiration so she asked me if I would make this card for her husband Paul. I believe the camper van is a logo of Animal brand clothing, which he loves and she has bought him something for their anniversary with the camper van on it, so this was the perfect image to use.

This is a view of the open easel card. I used the happy anniversary stamp that I have had for ages (I think it's Anita's - sorry, having an elderly moment today with my stamps and they're not currently with me as I am editing my blog at my parents). I'm afraid I cannot remember who made the background paper either, but I bought loads of it at Ally Pally last year! Sarn gave me the stamp and I added a black mirri card doily punch border and also mounted the sentiment and the image onto black mirri card. I then added three adhesive gem flowers.

I think the colours work really well, although I wasn't 100% sure when i started putting it all together, I initially thought that maybe I should have coloured the camper van in green, but I'm glad I chose the blue now. I am really pleased with how it turned out and Claire was over the moon! Another job well done xx