Followers

Showing posts with label Mo's Digital Pencil. Show all posts

Sunday, January 05, 2020

Happy New Year 2020

Hey bloggers
Happy New Year to you all.

I know it has been a while since I last posted, but, to be honest, my previous laptop was more trouble than it was worth to log in. Half of the keys didn't work, so putting in passwords etc was a nightmare. Anyway, I was extremely fortunate to get a new, fully functioning laptop from the Christmas Faerie and so I am a very happy bunny again. 

I am starting the new year with a promise (NOT a New Year's Resolution (as I always break those) to post every new card I make, this year, here, for you all to see (or not, depending on how many followers I still have) Lol.

I sadly, must confess, that my mojo has been somewhat lacking, as I realised the other day, that the last card I actually made was in January 2019 (a whole year ago)!!!

So, without further delay, here is my first card of 2020 and, hopefully, the first of many more to come.

All of the cards, made so far this year, have been commissions for my best friend, Maggie. She is the one solely responsible for getting my mojo back. So, thanks for that Maggie... hope you like them?

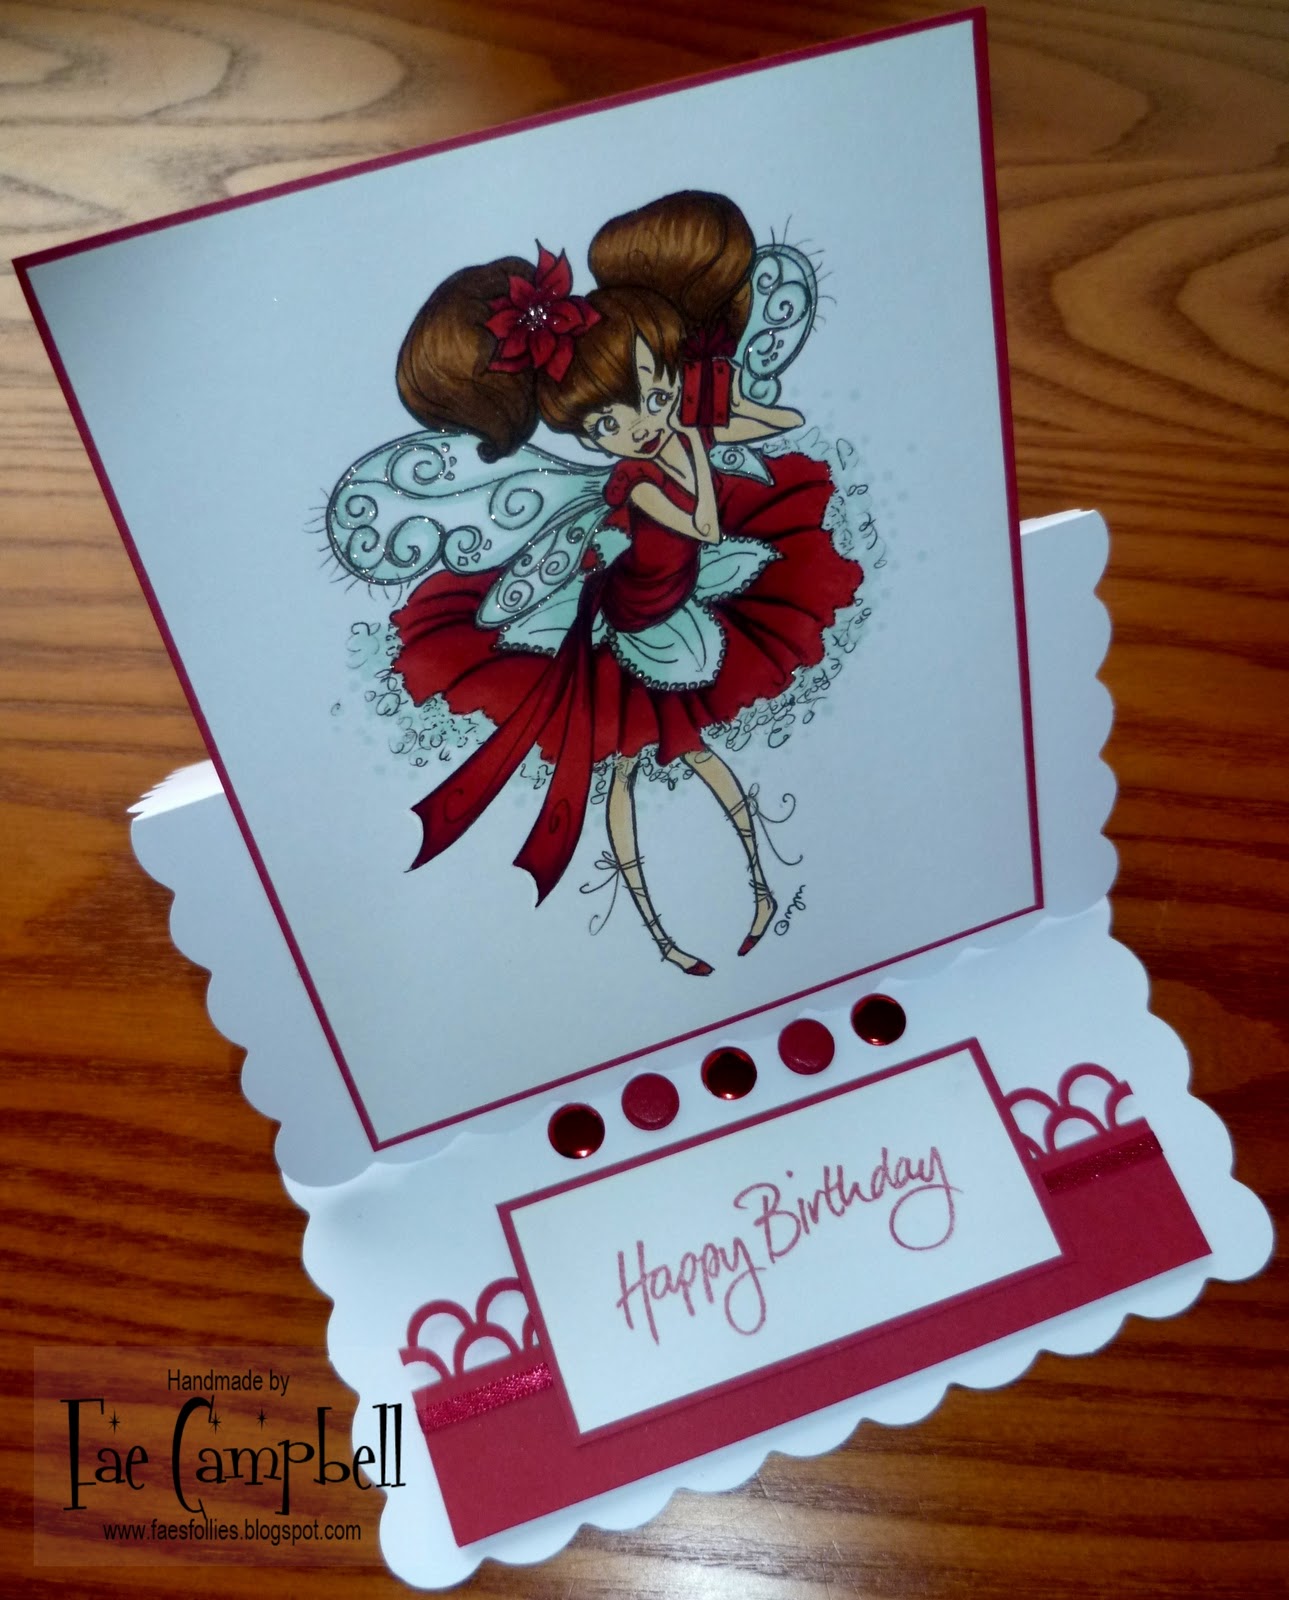
This card was made for Maggie's sister-in-law who celebrated her 60th birthday this week.  

I'm sorry but I cannot remember who the artist of the digi stamp is. I coloured her with my copic markers and mounted her onto matching colour cardstock.  I then cut out a circle of both white and then the same red again, just to give the background some interest. I then added some glitter letters and numbers from Hobbycraft and finally, I added a few red adhesive pearls. The inside was left black as Maggie wanted me to handwrite a personal message from her and her family on her behalf (as she likes my handwriting... awwww).

The second card I've made, so far, this year, was a thank you card for Maggie's counselling friend, Chris Barton. 

He is very good at getting someone to practice mindfulness and wellbeing and has his own clinic. Maggie also suffers with Multiple Sclerosis and so, Chris has literally been a godsend for her.

The digital stamp is by Mo's Digital Pencil, called 'King for the Day' and can be found here.  

I coloured him with my copic markers and added some texture to the chair by stippling, shading and highlighting. 

All of these techniques I have learned from Alyce Keegan of Kit and Clowder. She is a fantastic teacher and has an overwhelming number of members. Check her out, if learning better colouring techniques is high on your list of priorities this year. She really is amazing and is happy to discuss anything with you on a one-to-one basis if you are finding something difficult or need extra help. So don't be put off by her numbers of followers, as that alone should tell you just how great she is.

The final card of three, is another birthday card for Maggie's aunt, who will be celebrating her birthday on the 20th of this month. 

The image again, is from Mo's Digital Pencil, called 'Bronte Birthday, and can be found here.

Again, I coloured him with copic markers, and Prismacolour pencils. I used white card to mounted him, which I coloured the edges of using the same copic marker used on the tutu.

I then added some highlights using a Jellyroll White Pen and added some pink adhesive gems.  I used some pink sparkly background paper (from my scrap stash) and the card was finished.  

Again, Maggie wanted the inside left blank so that I could handwrite a personal message on behalf of her and her family.

So... that's it so far.  Looking forward to sharing many more with you in the very near future.

I hope that you all had a lovely Christmas and will have a very happy and healthy New Year.

TTFN, Fae xx


Saturday, July 14, 2018

Techniques with Kit & Clowder

Just a quick note

I realise Father's Day was last month in the UK, but I've just noticed that I didn't share my Father's Day card with you. I don't know why I didn't post it because I was really pleased with the outcome.

I don't know if you are aware, but I am a member of Kit and Clowder? Alyce Keegan does the most amazing tutorials each month for a nominal fee and teaches us so many new techniques. Each class has a pdf downloadable and printable booklet, many 'how-to' step-by-step videos to assist you through each step and sometimes free digital stamps or money off coupons/vouchers to purchase the stamp being used in the class, if you wish (although this is helpful, it is NOT compulsory and the class techniques can be applied to any stamp you have in your library / collection). My most favourite one to date is texturing.  I thought I would make a Father's Day card using some of the new techniques I have learned in the last few months.

I used a digital image from Mo's Digital Pencil - Mr Fixit and coloured the image in with my Copic markers.  I freehand drew on what I thought would pass for a 'six-pack' and chest muscle and then proceeded to add texture and shading to the t-shirt using my markers and the techniques learnt. Added a denim texture to the jeans and coloured in the rest of the image as I would normally.  To add the shaded area behind him, I used a dark grey Prismacolor pencil and some Sansodor which I blended with a blending stump. To add a little more depth, I then went over a small area closer to the image with a black Prismacolor pencil and again, blended with Sansodor.

I then cut it out with a circle cutter and again, slightly larger, with a background colour.  I then printed the sentiment and mounted onto matching background paper.  I then mounted two silver, glitter stars to finish it off.

Hope you like it?


Monday, July 02, 2018

Lazy Summer Days

Hello fellow crafters,

Here's a card I have made this week using a gorgeous image from Mo Manning called 'A Secret' and it can be found here.

I am entering this card into the following blog challenges:

Crafty Gals Corner - Anything Goes
Dragonfly Dreams - Summer
4 Crafty Chicks - Anything Goes (Summer)

I used Copic Markers to colour her and used Prismacolor Pencils and Sansodor to blend for the background and the sand. Kept the layout fairly simple and added the sentiment, which was included with the digi stamp.  Finally, I mounted her onto blue card and then again onto blue glitter card to finish it off.  Background paper was from my stash, unfortunately I can't remember / don't know which brand it is.

Hope you like her...?

Want to colour better?
The techniques I have used here, on her jeans and background, for example, have been learned through a Copic Colouring class I subscribe to, with the lovely Alyce through www.kitandclowder.com, she is very supportive, extremely talented and has so many different techniques on offer to assist you with your colouring growth.  If you want to join up, her classes are very reasonably priced and you are able to cancel at anytime. Kit and Clowder also have a Facebook group and Instagram.

Thank you so much for visiting today.
Fae xxx

Saturday, March 14, 2015

Busy, busy, busy...

Hi guys, girls and fellow crafty peeps.

I apologise that I haven't been on line for absolutely ages, I've been renovating my late Grandmothers' house AND it's finally finished AND we have some tenants in, who are absolutely over-the-moon with it.  I hope that they will be as happy in the house as my grandparents were.  They have a young baby so it'll be nice, I'm sure, to have some laughter in there after so long of being empty.  Anyway, it's all done.  Now back to some crafting.

Although I haven't been posting, I have still been making loads in my lovely, calm, craft room.  I'll post some pictures over the next few days, but in the meantime, here are a few I have made today.

My friend, Jane, is 50 on Tuesday next week, (St Patrick's Day) and it is also going to be her wedding day as she will be marrying her lifelong partner, Karen.

Hope the day is extra, extra special with double celebrations for you Jane.

The image is from the Sweet Tooth collection at Tiddly Inks, and is called 'Let Us Eat Cake'.  She can be found here.

The stamped sentiment is from Hero Arts, but I'm not sure who the papers are made by I'm afraid.  They are from my overflowing paper stash.  The card is 8" x 8".

I coloured the image with Copic Pens and added a few embellishments to finish the card off.

This next card was one I made for my sister-in-law's birthday.  I just love the way the colours worked out on this one as she loves yellow and blue and together I think they work really well.

Papers are again from a well overstocked pile of mish mash papers that have no markings whatsoever, to indicate who made them, so I apologise if they are something you would have been interested in purchasing.

The image is from Mo's Digital Pencil and I am entering her into the latest 'Anything Mo Goes' challenge.  She is called 'Bella Carrying the Cake' and can be found here.

Well, these are just two of quite a few I have made over the past few months, but as I said, its my first time blogging in a while so I will need to get back into the swing of things SLLLLLLOOOOOOOWLY, so please be patient with me.

A big thank you to everyone who has emailed me to make sure that I am still alive and kicking, it was nice to know I was being missed and thanks also to my followers who kept popping back regularly to see if I posted anything new. I promise to post a few new things each day for the next couple of days to make it worth your while.

Thanks guys x

Wednesday, October 24, 2012

Autumn Days

Hello Fellow Crafters...

Been busy this morning, I realised I was running behind on making a card for Mo's Digital Challenge and so I have made a cute card for the following blog challenges:

Mo's Digital Challenge #157, Autumn Fun
Fashionista Challenge, Anything Goes

I started with an A5 white base card and made it landscape. In paint.net I then merged a Mo's Digital Pencil digi stamp with a sentiment from Create with TLC digi stamp.

I coloured her in Autumn colours and stamped the leaves in copper ink to the base (the stamp is PSX F-2781).  I also stamped one more onto plain white card and cut the additional leaf out.

After printing and colouring the image I then cut it out and mounted it onto brown and then white card. I added some brown ribbon to the corners and some clear adhesive diamante gems.  I then added the leaf I cut out earlier to the bottom right corner of the card.  To make the clouds in the background I die cut a scalloped circle with my BigShot and then sponged blue ink over the template to make it look like clouds.

Hope you like the card and thank you for visiting my blog.
Hugs, Fae xx

Tuesday, October 16, 2012

All Boy...

Another card from me today is for the following challenges

Mo's DP2 Challenge '"B" is for...' and
Come and Get It Challenges using the colours Olive, Razzleberry and Pumpkin

First of all I printed off one of Mo's gorgeous images, 'Fixer Boy' and you can get it from her shop here because "B" is for... BOY, then I proceeded to colour the image using the three colours given above.


I love the overall finish of the card (the photograph doesn't really do it justice) and I was really pleased with the end result. I think I shall give this card to my nephew next month.

I then added a verse that I got out of the bargain bin at Alexandra Palace a few years ago and a charm.

Hope you like it,
Thanks for stopping by today,
Hugs, Fae xx

Friday, July 20, 2012

Big Girl

Hello Peeps
Another card that I have made for Lianne's 15th Birthday, next week, that I thought I would enter for Mo's DP2 Challenge #144 Hugs 'n' Kisses.

This is such a lovely image from Mo Manning over at www.mosdigitalpencil.com, she's called 'Big Shoes' and you can purchase it here.

The background papers used are from a paper stack called BLOSSOM from Grace Taylor, which was a recent purchase from Hobbycraft. The sentiment used is from Create with TLC and was a digital freebie.

Thanks for stopping by.
Hugs

Monday, January 23, 2012

Golden Couple

Here is my second Golden Anniversary card.

I made this card with one of Mo Mannings digital images and coloured it with my Promarkers and my Derwent pencils.

I coloured the image first then cut the image square. I had some yellow card off cuts and I ran one of them through the BigShot in a Cuttlebug embossing folder.

I then mounted all of the pieces onto the white card base and added some colour coordinated embellishments.

Hugs

Friday, January 13, 2012

Kitchen Knight

Hello again, it's me... I'm back

Here's another card made with a digi image from Mo Manning. It's called Kitchen Knight and you can find him here

I decided to colour him in in blues and reds and I just love that sleepy ol' dragon.

I mounted the image onto two colours of blue and added some thin ribbons down the left and along the bottom of the image. I then ran a strip of the same blue card through the BigShot with a Cuttlebug embossing folder to achieve the raised 'dots' effect and stuck that to one side of the 8x8 card blank.

Next I coloured the image using my ProMarker pens and my Derwent Watercolour pencils and some Sandodor to blend it all together.  I love the way the colinder 'helmet' and the saucepan 'shield' came out. It really looks good in the flesh!

I wish I could get the photographs to be a true depiction of the colours I have used as these look a little muted by comparison.

Anyway, it makes a nice change to make a card for a child.  I think I might have to make a male card next. I haven't done one of those for a while and I hate doing them unless I am specifically asked to make one, so I think my January CHALLENGE to myself would be to make a male birthday card.

In fact, during most of my blogs visits lately, I have noticed that almost ALL of the cards have been girlie and rarely anything for male birthdays.  I think others should be making a few male cards aswell.

I hope that you like my card and thanks once more, for stopping by.

Hugs xx

Saturday, January 07, 2012

Fairy Pia


Hello again

This card was made using one of Mo Mannings (www.mosdigitalpencil.com) images. She can be found here

I just love using digi stamps as they are so easy to edit and change the size to suit your card.  This card is 6x6 and I have made it into an easel card. You can see how the easel works in the second photograph, which shows the card open and 'standing'.

This card wasn't made to order, it's just another one for my 'box' at work. It's always handy to have a selection at work so that if someone wants a card as soon as possible, they can generally find something that is suitable AND it's still handmade, which makes it all the more special, plus it gives you the opportunity to get your name and your work noticed.

I do get quite a few orders from people who I don't know, but who have received one of my cards. It's always nice to get good feedback and especially nice when someone you don't know places an order for other cards.

Hope you like my card and thanks again, for stopping by.
Hugs

Thursday, December 29, 2011

Winter Fairy Talva

Hello fellow crafters and creative geniuses...

Well, hopefully as you can see, Santa bought my creative mojo back and I have made not one, or two... but THREE cards this morning, which I am really pleased with as they all turned out exactly as I pictured them in my head.

The first is using a new digi stamp from the ever talented Mo Manning over at Digital Pencil Too. Those of you who know me, know that apart from Vampires and all things super natural / paranormal, I absolutely love Fairies, hence my name. So here is a card I have made using one of Mo's winter fairies.

I decided to make the card an easel card and used my scalloped edged card bases from Craftwork Cards to produce it.  I used my large die cuts to create the topper cardstock and then cut out the image using one of the smaller ones. After cutting the image I kept it in the frame and then inked the edges using a make up sponge and some ink from one of my pads (Strawberry Fool from www.elzybells.co.uk)

I coloured the image using my promarker pens and added a little glitter to her wings.

I then added some gems to stand the easel up and a greeting and some ribbon. I  decided to make the greeting the same colour as her wings as I think there might have been a little too much red on it otherwise and I think the blue breaks it up just right.

I think I might get quite a bit of use out of this stamp as not only is it good for Christmas but I can also get away with using it for winter birthdays etc.

Anyway, I hope you like it and to finish the whole thing off, I have added a photograph of the whole card closed, so that you can see more detail rather than just the open card. If you click on the image it should bring it up even larger for you so that you can see how I have created the folds and pleats in her skirt, using not only my promarkers but also by using my Derwent pencils to create shadow and light. Hopefully I did it correctly, I found this brilliant tutorial on You Tube. If I can find it again, I will post it here so that you can see what I followed. Although I know most of you out there are already very capable of producing brilliant cards, some might find the video useful.

Hope you like it and thanks for stopping by today.

Hugs and kisses.

Monday, June 27, 2011

A Splash of Lime!

Hi girls (and guys)
Hope you have not been too worn out by the 'heat wave' we have had today.

Just wanted to share a little card I have been making this evening for the new Baby Cremins. Hayden Thomas, who was born on 23rd June 2011.

I thought I would enter this card into the following challenges:
All Sorts - Lemon and Lime
Cute Card Thursday - Sketch #170
Mo's Digital Pencil Challenge - Fancy Folds

As you can see, the card mainly consists of lemon and lime colours and I have used the sketch as requested by Cute Card Thursday and the image is one of Mo's, using an easel 'fancy' fold.

Hope you like the card.

Hugs xxx

Saturday, April 09, 2011

Ela's First Birthday

Hello fellow crafters and friends

Just thought I would take some time on this gloriously sunny day to upload a few of the cards I have made in the past week or so.

This first one is for Ela Mai's FIRST Birthday and was created using an image from Mo Manning at Digital Pencil Too.

I made an easel card base and then decorated the top. I printed off the image and added the words, then cut a circle around it using my circle cutter. I then cut a slightly larger circle out of diamond mirri card. After I coloured the image using my promarkers, I added some DP to the base card, some flowers and some pearls. I then mounted it the 'circles' to the base of the easel with foam pads.

Thanks for stopping by, hugs xxx

Wednesday, March 30, 2011

1st Birthday Cards

Hi girls (and fellow crafters)

I'm sorry for my lack of posts recently, haven't been feeling that great and my mojo was seriously lacking inspiration.  Anyway, RWO colleague's at work asked me TWO 1st Birthday card's and this is what I came up with.

I used one of Mo Manning's digi images and you can see this one and many more of her great creations at Mo's Digital Pencil Too. I made both cards using the same image but you will see that both cards are very, very different from each other. The first one is for Ava.


The second one is for Heidi.  Heidi's card is an easel card and I added lots of flowers whereas I didn't think Ava's card needed the little extra bits. However, saying that, I like them both for different reasons. Ava's card is very simple and Heidi's is a bit more decorative.

It's not much to look at when the card is flat but when it is standing up, it looks much more decorative.

I hope you like them. They were well received and I think that the parents of both of these little girls will appreciate their one-of-a-kind-ness.

Thanks for stopping by. Hugs,

Sunday, February 13, 2011

Shy

Hello girls

Here's my second card for today...

The image is from Maurie Manning at Digital Pencil too and is called 'Shy'. Isn't she adorable? I kept the colour scheme as pink, brown and gold (and used my infamous spotty background).

I coloured her with promarkers; blush, ivory, umber, henna, cocoa, cinnamon, ruby, cardinal red and ice grey 1. And for the bear; cocoa and cinnamon. Hope you like it?

Thanks for stopping by
Hugs, Fae xxx

Thursday, January 27, 2011

When nothing goes right...

Sorry... me again!

This is a card I have made for Mo's Digital 'It's a Color' Challenge.  This week her 'Design Team Member', Elaine, challenges us to make a card using only Red, Yellow, Orange and Neutrals (i.e. Black, White, Off-White). So I made a card using just those colours on a white base card.


I, of course, used one of Mo's Digital images and coloured him in orange PJ's with red stars and a red dressing gown. The box of tissues is yellow as is his hair. The sentiment is from Create with TLC 'When nothing goes right...go left' which is perfect for when you're not feeling very well and nothing seems to go well. I added some DP from My Mind's Eye 'Bright Dots' paper stack. and some orange and yellow flowers.

The base card is 6" x 6" and was a recent purchase from HERE. They supply excellent quality card stock (among other things) at VERY reasonable prices. Pop on over and take a look for yourself.

Hope Mo and her DT like it?

Thanks for visiting me today.
Hugs, Fae xxx

One for the Girls... and Boys

Hi girls... me again
These are two cards I have made using the same Mo Manning image 'Kai is One'. Although Mo has created two images, 'Kai Girl and Kai Boy' I bought Kai boy as I thought I would get away with colouring the same image in blue as well as pink. Anyway, I'll let you be the judge on that one. Here are the cards I created using the one image:


I coloured them both using my ProMarker pens.  The pink card is a 5" by 5" and the blue card is a C5 gatefold card.


What do you think? Do you think the same image works for both genders? I think so? And I am really pleased with how both of these cards turned out.

Thanks for stopping by.
Hugs, Fae xxx

Monday, November 08, 2010

Heidi's First Christmas

Hi girls, I'm back.

A friend of mine at work wanted a special card for his Niece and God-Daughter Heidi (her first christmas), but after trailing the High Street looking for something special, and not finding anything, someone else at work suggested that he should come and see me.

I told him that I would make him something special and something that couldn't be found in ANY shops. I hope that I have done him proud. I personally think I have nailed it and I am really pleased with the final outcome.

I started off by merging TWO of Mo's images together, Snowman and Kai's Christmas images, in paint.net and added the text using the font called Fontdinerdotcom Sparkly, downloaded for free from www.dafont.com in pink and then I printed the image off. I wanted to keep the card quite pink and girlie and used ProMarkers Blush, Ivory, Blossom, Rose Pink, Cocoa, Pumpkin, Poppy and Cool Grey 3. I then added my infamous spotty background and some glitter.

My next task was to put it all together; I mounted the image onto pink card stock and then cut the border using my Martha Stewart Stars punch and then added some pink gingham ribbon. I mounted that onto white base card and added some of my swirly paper from Craftwork Cards and then added the flowers in the top right corner with my glue gun, to which I added a little glitter. Job done!

Hope he likes it as much as I do.

Hugs, Fae xxx

Sunday, October 24, 2010

Mother and Son crafting sesh 1

Hi girls

Me and Lewis have been having a fun weekend making cards together. It's been lovely. He's been copying all my cards and we've just had lots of fun. I think he's a chip off the old block too because I think his cards are fab!

Here's my card using one of Mo Mannings images from Digital Pencil. I just love this image as it reminds me of my childhood. Me and my parents dogs would just fall asleep anywhere, usually with me using one of the dogs as a pillow. I think my parents have even got a photograph of me in a similar pose with one of the Dobes. I'll have to see if she can hunt it down.

I added some scrap DP from My minds Eye 'Dotty Stack' to a black mirri card base card and then mounted the image onto red and black card and then added the flower which was a prima flower in pink and black but I used my ProMarkers pens to re-colour the flower in red to match.

And here is Lewis' card (he's 9 years old BTW) using a similar image (mine is a little girl and his is a little boy). Isn't it brilliant? I helped him do the dots because he was worried that he had done a little too much around the edges. I think it's perfect just the way it is. I'm looking forward to crafting some more with my new crafting buddy. It's nice to have company now and again but he was so enthusiastic and so pleased with what he had managed to create that I thought I had to share it with you all.

Thanks for stopping by
Hugs, Fae xxx

Thursday, September 16, 2010

White on White

Hi Girls

Well...I got up this morning and had a look at Mo's challenge blog and discovered that this week's challenge was 'white on white'.

The image can be coloured but the background and the embellishments must be predominantly white.

So... I thought this might be a bit tricky at first but then the telephone rang and it was my Aunty Rosanne.  For those of you that know my family or know of my family... we never talk for five minutes and hang up! It's ALWAYS an hour long conversation. Which is great, because I love talking to my Aunty RoRo, she's always out when she calls, and so usually ends up having a conversation with me and most of London too while she's at it.

Today she was shopping for Disaronno and discussing tiger bread (which made me VERY hungry). Anyway, the conversation flowed and while that did, so did my creativity. I made this card the whole time I was on the phone to her. I literally finished it... as we say our goodbyes! One hour and twenty minutes!!!

Here is what I did:
The image used is 'Angelica's Balloons' by Mo at Digital Pencil, which I printed off twice (main image and for decoupaging the balloons). First of all I took some white embossed DP and placed it onto the top of the easel card. Then I cut another piece to fit the base and cut out a large circle using my nestabilities and my Big Shot. I stuck these down. I then used the same scalloped cirle to cut around my image, which I coloured with me ProMarker pens: Blush, Ivory, Blossom, Pastel Pink, Tan and Sandstone. I stuck this down to the front of the easel and added 1mm adhesive pearls. I printed off another image and just cut out the balloons, which I coloured and decoupaged over the first image with foam adhesive pads (so that they were 'out of the circle').

I then added some ribbon, some flowers (using my new hot glue gun) and... here is the finished card. Hope Mo likes it, but hope you do too?

Thanks for stopping by.
Hugs, Fae xxx