Followers

Showing posts with label Forever Friends. Show all posts

Monday, August 22, 2011

Forever Friends '3D' Challenge

This fortnights challenge from Forever Friends is a 3D challenge and is sponsored by Stitchy Bears.  I decided to make my card on an acetate base and then added several various layers.

Here are a few images of my card so that you can see the different layers.  I decided to stick with a pink and black theme as the fairy is just too cute to be any other colour than pink.

I added a sentiment from Lili of the Valley and the background was cut out using a Martha Stewart around the page punch. The black circle scallop was cut out using a large scalloped nestie.

I am so sorry but I can't be sure who made the back ground paper, but I think it may have been Pink Petticoat???

Thanks for stopping by and don't forget to pop over to the Forever Friends blog and have a go at this fortnights challenge. Remember, you do not have to use a Forever Friends image in order to take part, you may use any stamped image, as long as it's an animal of some kind. You never know, you may win, but you have to be in it to win it. Good luck!

Tuesday, July 05, 2011

Forever Young

Hi ladies
Just a quickie as it's late and I have been editing cards all night and now I am seeing DOUBLE.

Anyway, here's a little card I knocked up in the week using a Forever Friends stamp for a very special lady, who is celebrating her 85th birthday this week. A colleague, Linda, at work asked me to make it; only specifications were to have her name, age and flowers on the front. Well... I figured it had to be special, as it was such a significant birthday (well as far as I am concerned it's a specific age), so here is what I created for her.

I had to make a box envelope for her too as these flowers are pretty BIG and stand some way off the front of the card. I also decorated the inside of the card, but neglected to photograph it before I took it into work to give it to Linda.

I cut out the letters and the numbers by hand, after printing them off onto paper and tracing them. I added some brown DP with pink glittered leaves and then cut out my stamped image using my circle cutter. I then added the flowers, the ribbon etc and then finally the numbers and letters over the top with foam pads.

Linda really liked it and apparently, so did Nancy.
Happy Birthday special lady. Congratulations!

Thanks for stopping by. Hugs xxx

Monday, June 13, 2011

Forever Friends 'Spots & Dots' Challenge

Hi guys and girls
Sorry it's been a while, but here is my card for this fortnight's Forever Friends Challenge (Spots and Dots sponsored by I am Roses). Remember, you don't have to use a Forever Friends image, check out the FF Challenge Blog for the new rules.

Here's my card:
I used Promarkers to colour it in and used a rubber stamp image for the calender embellishment (from Lili of the Valley) at the top left. Coloured the background with my usual 'spotty background' and added some Candi from Craftwork Cards. The border punch was created using my Martha Stewart punch and the background papers are from First Edition Paper (Sweet Owl Collection).

Thanks for stopping by.
Hugs xx

Sunday, May 01, 2011

Forever Friends Buttons & Bows Challenge

This is my card for the latest Forever Friends challenge, 'Buttons and Bows'.

We were asked to make a card using a digi stamp from Di's Digi Downloads and (of course) a Forever Friends image. So Buttons and Bows was the theme and this is the card that I made. One person has seen this card so far, as I made it for my BFF, Sarn, who celebrated her birthday on St George's Day. Her lovely hubby Gra took her into London for the day and it sounds like she had a fab time and also some fabulous weather. Hope you had a lovely day Sarn?


Anyway, back to my card.... I merged two Di's Digi Downloads images together and then stamped out a FF stamp, which I coloured and cut out and then decoupaged to the image with foam pads. I then coloured in the rest of the image and mounted some DP to the base card. I then mounted the whole thing onto pink mirri card and then added some buttons, a bow and a sentiment. Hope you like it?

Hugs xxx

Tuesday, April 19, 2011

Forever Friends Challenge Sketch

Once again, I apologise for my tardiness in this fortnights Forever Friends challenge, as it is the Easter holidays here, we decided to take an inpromptu visit to Norfolk for a long weekend to make the most of our good old British weather! And NOOOOOOOO internet!!!!

So, without further ado, here is my creation for this fortnight's challenge.


You will need to follow the sketch (as shown below), you must use a Forever Friends image and basically as long as you use the sketch (you can flip it or rotate it to suit your needs) you can then add your link on the Forever Friends Challenge blog.

Here's the sketch. I can't wait to see all of your lovely creations. Thanks for stopping by to visit me.

Good luck!

Saturday, March 20, 2010

Just the 2 of Us

I made this card using the sketch on the Sketch Saturday Blog. Sadly I wasn't able to get my entry uploaded in time for the challenge but I had great fun using the sketch nevertheless.

This was made with another of my Forever Friends stamps and my promarkers. I cut the oval by hand and then added the stamped image which was then coloured with Pro markers pens. I then added the sentiment, the flowers and mounted the additional hearts onto foam pads for a raised effect. I was really pleased with how this one came out and I think I would like to use this sketch again for another project. Really pleased.

As I am still in time for the Blog Challenge over at Teddy Stampers, I would really like to enter this one into their challenge which is "To Mother with Love".

Forever Blossom

On this card I have used my new Forever Friends stamp and coloured it with Pro Markers, Sandstone, Blossom and Ice Grey 1. The grass was coloured with my green copic, as the brush tip is perfect for flicking back the grass.

The little white spots on the grass were created with my white gel pen, for a little 'daisy' effect. I like doing this. The sketch was fairly basic but I decided to keep the pink and black theme going. I made three pink cards in an evening so I'm really bored of pink now.

Thursday, February 18, 2010

Forever Flowers

A cutesy forever friends image on this lovely little card. C5 sized, it's petite but packs a small punch. I'm really pleased with how this little card turned out. I used the MS doily punch on yellow and white cardstock and then mounted it onto a swirly orangy background. I then added the ribbon and embellishments and some glitter to the flowers. The image was coloured with my promarkers and I added grass by his feet. Lovely, really pleased.

Saturday, January 23, 2010

I Love You

Again, another view of the forever friends heart stamp. This time I stamped it onto water colour paper and coloured it with promarkers. I then stamped three hearts and pushed a brad through each of them. I then mounted them to the image with foam pads and added the image to the base card. I then stuck down the glittered letters to read 'I love you' and added a 'love' brad to the 'o'. Hope you like it.

Be Mine

Getting in the mood for Valentine's Day, I decided to make this card with my favourite forever friends stamp. The back ground has been stamped with heart and 'be mine' stamps in black and the image, once coloured with my promarkers, was mounted onto magenta mirri card. The larger hearts were stamped onto the same magenta mirri card with stayzon and cut out. I then added the ribbon, which was recycled from one of my jumpers. Matches perfectly. Hope you're all getting ready and excited about Valentines Day as I am and hope you all get loads of goodies.

Saturday, January 16, 2010

Good Luck Claire

My friend Claire, is going into hospital on the 27th January for an operation. Her daughter came round this morning and we had a little crafting session. She's only a little bit older than Lewis, but she loves getting crafty with card making and altogether, she made four cards.

I made this one for Claire. It's dead simple but I think the background paper works really well the base card stock colour and the ribbon. The good luck stamp was a gift from Sarn's sister, Sharon and it works really well with the scalloped circles, because of the edging around the sentiment.

Sunday, January 10, 2010

Monochrome Bear

This lovely little card was made with my new Forever Friends stamp that I bought from the Glitter Pot (www.theglitterpot.com) and some monochrome background paper from Tina Fallon (www.tinaandco.com). The large black flower was purchased recently from ebay and they are made by Petaloo. I have added a sentiment and white dots using a white gel pen to the petals. Added the ribbon and mounted the image onto black card stock. Drew some faux stitching and the edges and SIMPLES. Hope you like it?

Saturday, January 09, 2010

Time for Cocoa

I made this card for one of my work colleagues. I can't remember her name (hah, only joking). It's her birthday soon and I wanted to make a card that all the girls in the office could sign.

The letters have been done using a technigue I saw demonstrated at Alexandra Palace, where they stamp each letter with the same image as the main and then colour it and cover with glossy accents. I then used foam pads to decoupage them on the right. I stamped the image and coloured with (ruby, cinnamon, pastel blue and lime green) promarkers and then decoupaged the jacket, glove and cup. Added a ribbon and flowers to finish.

You don't bring me flowers

Oh wow, I love snow days.... I'm on a roll with my crafting. Here's the first of many. I bought this stamp from www.theglitterpot.com as they have a 50% off sale on certain stamps and I love Forever Friends stamps.

This card was originally intended to be a Valentine's card, but I didn't think it was special enough for my hubby so I added the birthday sentiment at the top. I mounted the image onto red mirri card and coloured it with my promarkers (cinnamon, ruby and amethyst). I border punched the bottom with my Martha Stewart Doily punch and the basecard is stamped with my Rhonna Farrer clear stamp. I then added the raffia and the flowers to finish. The parcel and his hands have been decoupaged.

Sunday, January 03, 2010

Lavender Flourishes

Another card using the same techniques as before on my first card of 2010. The Autumn Leaves stamp was stamped with my Metallic Pink Encore Stamp Pad onto the base cardstock. Then I cut out a piece of lilac cardstock for layering which I edged with Stayzon and cut a border with my new Martha Stewart Doily Border Punch. I then used my nestabilities to cut out the Forever Friends image which I coloured with Cinnamon, Forest Green and Ruby ProMarker pens. I then added some ribbon, a sentiment and some lilac flowers with gemstones to one side of the scalloped circle and added some glitter to the image. Hope you like it. It's not as busy as the previous card and much more simple, I think that's why I like it so much. I suppose I could have used a similar layout with a wedding cake stamped image and it would have looked just as nice.

Make a Wish

My first card of 2010. I made this card using my Autumn Leaves clear stamp by Rhonna Farrer on the base cardstock and then edged it with my new Martha Stewart Doily Border Punch. I stamped a Forever Friends stamp with Adirondack and then coloured it with Ice Grey 1, Blossom and Spice ProMarker pens. Before matting and layering the scalloped shapes and the Forever Friends bear I added glitter to the Autumn Leaves flourishes. Then I added all the layers and the lettering which was cut out on my BigShot with Cerise MirriCard. It's a bit busy for me, but Lianne liked it so I have included it on my blog for all to see. Hope you like it.

Saturday, December 05, 2009

Forever in Pink

Made this forever friends card a while ago but I don't think I have had five minutes to upload it to my blog yet (or at least I don't think I have - apologies if it's already on here somewhere). The lovely spotty background paper was mounted onto black cardstock and I also mounted the image onto black cardstock and then coloured in the image with brown and pink ProMarkers and then added some clear glaze to give it some definition. I added the sentiment (bought ages ago, and only just rediscovered).

Why do we buy things only to put them somewhere and not find them again for an age afterwards? Not that I mind, it's like finding a whole new stash once a week... YAY FOR THAT!

Saturday, November 21, 2009

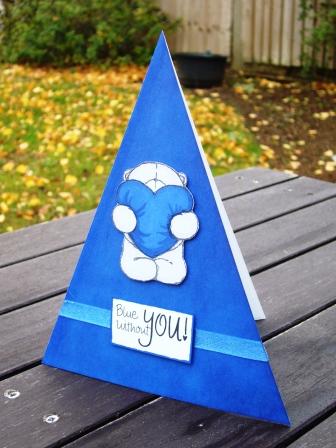
Blue without YOU!

Was bored yesterday so I wanted to make something different to my usual square or A5 cards. I made this triangle card and coloured the whole thing in with my blue ProMarker pen and then stamped a Forever Friends image and cut it out and mounted it with foam pads. I made the sentiment myself, 'Blue without YOU!' and mounted it over some blue ribbon.

Sunday, October 18, 2009

Forever Sparkly

Loving these papers that were purchased from AP. Added some glitter to the outline of the flowers just to create a little bit more sparkle. Added some more glitter to the champagne bubbles and coloured in the FF bear with my new Copics.

I love my Copic pens but have to say that although I have kept them flat, rather than standing up, as instructed, they still seem to be running out a lot quicker than my ProMarkers have. Either that or I am using my brown and grey a lot more than usual. Which seems a bit unlikely as I have used them no more than I have my ProMarkers...???

Saturday, September 12, 2009

Birthday Boy

Lewis's Birthday this year falls on the same day as Ally Pally, so unfortunately we are going to have to celebrate his birthday on the Saturday, as birthday or not, I cannot miss out on AP. I have made this card for him for his sister Lianne to give to him. He likes the Forever Friends bears and I didn't want to make it too BLUE so I added some green to it and the background paper was perfect for this colour combo. Can't remember where I bought the background papers from but the stamp came from e-bay and the greetings are by Anita's. The glittered numbers came from Tesco's and the ribbon was bought from the Ribbons and Buttons stall on Watford Market.

This is the card in all it's glory. I haven't made the card from me and Steve to give to Lewis yet but Lianne loves this card and can't wait to give it to him. He's going to be eight and it seems as though he has been seven forever! And yes, he has forgiven his mummy for choosing AP instead of spending the morning with him, but we are going to more than make up for it when I get back and on the Saturday before.